

 1. I began by printing out my image on an inkjet printer. I have heard that the transfer techique works best with a freshly printed image. Unfortuantely, I can't tell you whether this actually makes any difference or not because the copy I used was printed out the same day I did the transfer. I suggest you print out several copies of the image you want to use to allow for any experimentation and/or screw-ups that might occur. (Believe me, I have had first hand experience with screw-ups of all kinds!) After you print the image you want, then cut it out using a scissors or a craft knife.
 2. Cover the area where you want to place the transfer with a coat of Gel Medium. I used Golden's Soft Gel Medium in Matte. I have heard that you can also use Regular Gel Medium as well, but I personally find the regular consistency too lumpy for my taste. Some people prefer to coat the right side of the image with the gel medium instead. I really don't think it makes any difference in the transfer. Again, I would say to try it both ways and see which works better for you.
 3. Place the image, face down, into the wet gel medium (as if you are gluing the two papers right sides together - I know, it sounds scary!) and burnish with a bone folder or the back of a spoon. I always follow up the burnishing by rubbing my fingers over the back of the image just to make sure that there are no lumps of gel medium left. Also when burnishing, try not to let the paper with the image slip and slide otherwise your transfer will smear and be blurred.
 4. Gently lift up a corner of the image and slowly peel it away. As you peel, check to see if the image is transferring. If not, burnish a little more. Now some people wait until the gel medium dries completely to remove the image. (If using this technique, you will need water to dampen the back of the image slightly while you rub the paper backing off with your finger.) I have always been too chicken to do this, for fear that I won't be able to remove the paper. So I just peel the image away within a minute of burnishing. But this is where it would be good for you to test the process on a scrap piece of paper, similar to the type you will be using in your project, just to see which technique is best for you. Also, keep in mind that if you are doing this in an older book like me, old book pages are very dry, brittle and porous so the result may be different than if you did it on scrapbook paper. I suggest you take the time to experiment to avoid any heart-ache due to unexpected results. (Note - if your image transfers/peels cleanly, you will be able to save the original paper, which will now have a fainter version of the original print still on it, and use it for another piece of artwork. It's like getting two images for the price of one!)
5. And Voila! Your image has been transferred!! If you'd like to read an article on everything you ever wanted to know about Gel Medium Transfers you can go to Zeitgeist Art Gallery. Be sure to scroll down to the bottom of their page for step by step how-to pictures. Lynne Perrella also writes about how to do Gel Medium Transfers, as well as other types of transfers in her book, Artist's Journals and Sketchbooks. You can read an exerpt here. Also Holly Harrison's book, Altered Books, Collaborative Journals & Other Adventures in Bookmaking has more information on these types of transfers. Here is an exerpt from her book.
Whatever method you try, have fun with it. Art is full of experimentation and trying different techniques. And remember, sometimes the best art comes from those happy little mistakes we make along the way. Have fun, and feel free to contact me if you have any questions!


19 comments:
Oh goodness! Thank you, Thank you, Thank you...Im going to try this asap. Yours looks amazing. Tracy
Gosh, your reading my mind...I was just 30 minutes ago reading in a book I have on gel transfers, but I have to be honest I think our blog friends give WAY BETTER explanations!!!!! I'm taking notes!!!! I have a altered book about to be born in me right now ;)
question: do you save one brush for gel mediums only? (how is the clean up on it?)
oh thank you thank you!!
i love your details & images to help. i am a visual learner!
headed to michaels today to grab some supplies!!
you are wonderful!
xo
Absolutely wonderful! I am NOT one that creates art however this one interests me! I think I can! I have many images of nature that I know I'd LoVe to see this way! Thank you for inspiring me to take a leap in another direction with nature!
P.S. I came in by way of Heathers'site :) NG
Very,Very cool. I have not tried this yet. I really want to now. What type of materials can you transfer an image on to? Thanks so much for the tutorial!
Thanks! I love a good tutorial :)
This is so cool. Love the effect! Thanks for sharing:)
Kari
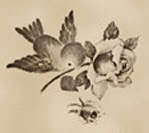
jeanne! thank you so much for this tutorial. i love your birdie transfer.
I have tried several gels and they come out ok but after I rub off all the paper and wet the piece and it dries it looks like it still has paper left on the object and I wet it again and no more paper comes off why is that?when I wet it it is vibrant but when it dries the picture is very pale thanks ladypip35@bellsouth
I keep leaving my comments and it keeps returning to the same thing can you tell me what I am doing wrong. Ladypip35@bellsouth
thank you for this great tutorial...tried it and it worked great!
kathy
thanks for your easy to follow explanation, your image looks stunning!
Thanks so much for the tutorial it was so easy to follow.
keep them coming. I have just tried this, and it came out perfectly second time around. thanks heaps.
I found you through google, looking for gel medium transfers and how to do that... OHMY! You explained it perfectly!!! I'm off to try it today! Thank you so much, have a nice weekend!
Looks great!))
So Beautiful!!! Thank you for the pointers...cannot wait to play :)
I want to thank you so much fo this tutorial, more clear instructions one cannot wish for! I just want to know, please - seeing that I am living on a farm, far away from craft shops, [or even grocery stores for that matter!] I just wondered whether anybody could help me with a recipe to make my own transfer gel at home? I think it would be much easier to buy the products and make my own gel at home whenever I need it.
Tank you again, I have long be waiting for a tutorial like this one, and now I have it "on my doorstep", hahaha ...
Cool bananas... Thank you for sharing... Your tutorial was so simple to understand ... Love it ... Shelly
Post a Comment